понеделник, 6 юни 2016 г.

Remote desktop connection from Ubuntu 16.04 to Windows 10 desktop via sstp client, vpn connection and Remmia


Here are the needed steps to run a RDP session from Ubuntu to Windows work PC.

Get the needed pakages:

https://launchpad.net/~eivnaes/+archive/ubuntu/network-manager-sstp/+files/network-manager-sstp_1.2.0-0ubuntu2_amd64.deb
https://launchpad.net/~eivnaes/+archive/ubuntu/network-manager-sstp/+files/network-manager-sstp-gnome_1.2.0-0ubuntu2_amd64.deb
https://launchpad.net/~eivnaes/+archive/ubuntu/network-manager-sstp/+files/libsstp-client0_1.0.10-0ubuntu6_amd64.deb
https://launchpad.net/~eivnaes/+archive/ubuntu/network-manager-sstp/+files/sstp-client_1.0.10-0ubuntu6_amd64.deb
from (https://launchpad.net/~eivnaes/+archive/ubuntu/network-manager-sstp/+packages?field.name_filter=&field.status_filter=published&field.series_filter=xenial).

Import a key from a termnal:

   sudo apt-key adv --keyserver keyserver.ubuntu.com --recv-keys 61FF9694161CE595

Create a repository list:

   sudo touch /etc/apt/sources.list.d/sstp-client.list

Add next lines:

   deb http://ppa.launchpad.net/eivnaes/network-manager-sstp/ubuntu xenial main
   deb-src http://ppa.launchpad.net/eivnaes/network-manager-sstp/ubuntu xenial main

Refresh the apt cache:

   sudo apt-get update

Check for installed SSTP:

   sudo apt-cache search sstp

Install needed packages:

   sudo apt-get install sstp-client network-manager-sstp network-manager-sstp-gnome -y

Create a new VPN connection by choosing newly added SSTP connection type.

Install Remmia (RDP client) to your Ubuntu and create connection to the desired host inside the office VPN.

All you need to view your workplace is to run the VPN connection and after that the Remmia RDP session.

Sources:

https://wiki.it-kb.ru/unix-linux/ubuntu/ubuntu-16-04-xenial-xerus-lts/how-to-setup-vpn-sstp-client-and-network-manager-on-ubuntu-desktop-linux-16-04-xenial-xerus-lts
http://askubuntu.com/questions/63739/how-to-set-up-an-sstp-vpn-connection
http://www.digitalcitizen.life/connecting-windows-remote-desktop-ubuntu

петък, 19 февруари 2016 г.

Double tethering - Share phone's Internet to Windows desktop through Ubuntu notebook

There was a case when I needed an Internet on my desktop, but only available was on my Meizu phone. After several touching (on the phone), searching in Yandex and clicking on mynote and desktop, the desktop machine was connected to WWW.
I followed 2 advices: http://askubuntu.com/questions/359856/share-wireless-internet-connection-through-ethernet and http://askubuntu.com/questions/169473/sharing-connection-to-other-pcs-via-wired-ethernet
There was no need to set manual IP-s, so the connection was established by default.

сряда, 16 септември 2015 г.

RST Оценка


Оценка сигнала
     Необходимый минимум обмена информацией при радиосвязи это позывной кореспондента и оценка слышимости вашего сигнала, переданная им для Вас. Для того чтобы оценить сигналы корреспондента, применяют так называемую систему "RST" состоящую из трех (для телеграфа) или двух (для телефонии) цифр. Первой - "R" -оценивается разборчивость сигнала по пятибалльной шкале , второй - "S" - сила сигнала по девятибалльной шкале, третьей - "Т" -(тон)-качество тона телеграфного сигнала по девятибалльной шкале.

R (баллов) Разборчивость
5
  Принимается все полностью
4  Теряются отдельные слова
3  Прием с большим трудом

S (баллов) Громкость
9
  Очень громкие сигналы
8  Громкие сигналы
7  Умеренно громкие сигналы
6  Прием с небольшим напряжением
5  Прием со средним напряжением
4  Прием с большим напряжением
3  Прием на грани возможного

петък, 11 септември 2015 г.

QSO Дневник 2015 г.

Дата Час Мой QTH Инициал Име Връзка през QTH QTH - постояннен Антена Приемам го на Приема ме на Забележка
11.09.2015  22:15  Сф. Симеоново LZ1ABG Боян
Нови Искър Нови Искър Mobile Q5 Q4 Лен 100 канала

петък, 3 юли 2015 г.

неделя, 2 февруари 2014 г.

RAMJ - Raspberry, Apache Tomcat, MySQL, Java host server

In this post I will show how to run RAMJ server for test purposes on Raspberry Pi computer.

Step 1

On Raspbian Wheezy, the Java is preisntalled (/usr/lib/jvm/jdk-7-oracle-armhf/jre/bin),
but in case it is not there you can install it easily.
There is no need to be Unix guru, all you need is to perform:
sudo apt-get update && sudo apt-get install oracle-java7-jdk
Our Apache Tomcat server needs to know where the Java is located.export JAVA_HOME="/usr/lib/jvm/jdk-7-oracle-armhf"
export PATH=$PATH:$JAVA_HOME/bin
Check the path echo $JAVA_HOME.

Step 2

Installing the Tomcat is not tricky too.
Download it from:
http://tomcat.apache.org/download-70.cgi

After the download completes, untar the file.
tar -zxvf apache-tomcat-7.0.50.tar.gz
Where,
-z : Uncompress the resulting archive with gzip command.
-x : Extract to disk from the archive.
-v : Produce verbose output i.e. show progress and file names while extracting files.
-f data.tar.gz : Read the archive from the specified file called data.tar.gz.

In order to start Tomcat, we need to add it as an environment variable in the /.bashrc file: sudo nano ~/.bashrc
We have add next rows to the end of the file:

export export JAVA_HOME=/usr/lib/jvm/jdk-7-oracle-armhf
export CATALINA_HOME=~/home/pi/apache-tomcat-7.0.50

After saving the additions we can make the changes effective by restarting the bashrc file: ~/.bashrc

It is more convenient to have Tomcat started on each linux startup.
For that we have to create start script and place it in /etc/init.d

sudo nano tomcat7
#!/bin/sh
# Short-Description: Start Tomcat.
# Description: Start the Tomcat servlet engine.
# Tomcat 7 init-script
CATALINA_HOME=/home/pi/apache-tomcat-7.0.50
export CATALINA_HOME
JAVA_HOME=/usr/lib/jvm/jdk-7-oracle-armhf
export JAVA_HOME
PATH=$JAVA_HOME/bin:$PATH
export PATH
case $1 in
 start)
 sh $CATALINA_HOME/bin/startup.sh
 echo "tomcat7 started successfully"
 ;;
 stop)
 sh $CATALINA_HOME/bin/shutdown.sh
 echo "tomcat7 stoped successfully"
 ;;
 restart)
 sh /home/pi/apache-tomcat-7.0.50/bin/shutdown.sh
 sh /home/pi/apache-tomcat-7.0.50/bin/startup.sh
 echo "tomcat7 restarted successfully"
 ;;
 *)
 sh $CATALINA_HOME/bin/startup.sh
 echo "tomcat7 started successfully"
 ;;
 esac
exit 0

After saving it with Ctrl ^x, we have to make it executable.
sudo chmod 751 tomcat7
sudo update-rc.d tomcat7 defaults

Check if it works, type sudo reboot, after the restart, type  in RP Midori browser the address of the default Tomcat's page: http://localhost:8080

Step 3

Now download the MySQL archve from: To be continued...

сряда, 15 януари 2014 г.

How do I run my ATX power supply without a motherboard?


Just short pin 13 and 14 as long as you want the supply to be on.


понеделник, 17 декември 2012 г.

Российские вещательные каналы - Настройка тарелки

София

Name: 75E ABS-1 (LMI 1) | ABS-1A (KOREASAT 2)
Distance: 39668km   
Elevation:  18.9°
Azimuth (true):  118.1°
Azimuth (magn.):  113.8°
LNB Skew [?]:  -40.4°

   
Name: 13E EUTELSAT HOT BIRD 13A | EUTELSAT HOT BIRD 13B | EUTELSAT HOT BIRD 13C
Distance: 37809km   
Elevation:  39.7°
Azimuth (true):  195.0°
Azimuth (magn.):  190.7°
LNB Skew [?]:  10.9°

   
Name: 40E EXPRESS-AM 1
Distance: 37946km   
Elevation:  37.9°
Azimuth (true):  156.1°
Azimuth (magn.):  151.8°
LNB Skew [?]:  -17.3°

   
Name: 49E YAMAL 202
Distance: 38241km   
Elevation:  34.3°
Azimuth (true):  144.6°
Azimuth (magn.):  140.2°
LNB Skew [?]:  -25.2°

събота, 15 декември 2012 г.

Российские вещательные каналы бесплатно / Free Russian TV

Дорогие друзья :)
После долгих но не бесполезных мук, настал черед поделится с вами,
как можно смотреть российские вещательные каналы на халяву без никаких оплат.


И так:
Выберам сайт аукцион (например prodavalnik.bg; bazar.bg или auction.bg).
От туда можем заказать бэушный спутниковый приемник и дешовую спутниковую тарелку.
На данний момент нет необходимости приобретать HD спутниковый приемник.
Цены на приемники - разные :) Все-таки можно найти тарелку и приемник за 60 лв (30+30).
После приобретения комплекта, устанавливаем тарелку в сторону спутника Hotbird.
Заходим на сайт dishpointer.com, указываем свое местоположение и выбераем Hotbird (13Е).
На сайте вырисовывается направление тарелки, угол тарелки приблизително 35-40  градусов.
В меню приемника выбераем настройку спутника, вертим тарелку плавно до получения максимальной силы сигнала :)
Проводим настройку транспондеров и каналов.

Находим российские каналы...
У меня появились Первый, Россия 24, Planeta RTR, Беларусь ТВ, 1+1, К+, РБК ТВ, RU TV, TV RUS, Russia Travel Guide,  Russia Today, Russia Today Doc, Шансон ТВ.

Вот и все :) Жизнь удалась :)

Вывод: За ~60 лв можем смотреть основные каналы не оплачивая никому никаких абонентских плат.

понеделник, 15 октомври 2012 г.

Installing aircrack-ng and reaver on Fedora

yum update (optional)
yum install aircrack-ng

get reaver from http://pkgs.org/fedora-17/rpm-sphere-i586/reaver-1.4-2.1.i686.rpm.html
Install it too...

That's it.

петък, 12 октомври 2012 г.

Installing latest Skype on CentOS 6.X

1. yum update
yum install libXi.so.6 libXss.so.1 libasound.so.2 libXv.so.1 libSM.so.6 libXrender.so (not always needed)
yum install wget (if not installed)
2. yum install libXi.so.6 libXss.so.1 libasound.so.2 libXv.so.1 libSM.so.6 libXrender.so
3. yum localinstall --nogpgcheck skype-4.0.0.8-1.el6.R.i586.rpm

сряда, 12 септември 2012 г.

Check your WiFi network strength

Everybody says: 8 symbols are enough...
I am not so sure. If we use a bad password, we make our wifi net very vulnerable to the open world.
For example an wifi protected with WPA2 and a pass with 8-9 digits only can be opened (with simple desktop pc) for couple of seconds. If we have 15-16 symbol not pretty nitty pass, it'll take 4-6 hours.
Let's take a look how to check our wifi strength:

1. First we need to download the source of the program called reaver, needed libraries, to build and to install it.

wget http://reaver-wps.googlecode.com/files/reaver-1.4.tar.gz
tar -xzvf reaver-1.4.tar.gz
apt-get install libpcap-dev sqlite3 libsqlite3-dev libpcap0.8-dev
cd reaver-1.4/src
./configure
make
make install

2.  We have to install and build aircrack-ng from source

apt-get install build-essential libssl-dev
wget http://download.aircrack-ng.org/aircrack-ng-1.1.tar.gz
tar -zxvf aircrack-ng-1.1.tar.gz && cd aircrack-ng-1.1

3. We must make a modification in common.mak, without it the build process will fail

pico common.mak
# modify this line:
CFLAGS          ?= -g -W -Wall -Werror -O3
# to look like this:
CFLAGS          ?= -g -W -Wall -O3
make
# run as admin:
airodump-ng-oui-update
make install

4. Final step is to put our wlan card (wlan0) into monitoring mode and to start the reaver

airmon-ng start wlan0
airodump-ng mon0
sudo reaver -i mon0 -b 00:00:00:00:00:00

5. And the last - to wait until you've get the result.

петък, 27 април 2012 г.

Яндекс Диск - 100 пъти по-як от Google Drive

Наскоро си пуснах Яндекс Диск. Приятно ме изненада удобният интерфейс,
леснотата при работа с него и най-вече това, че работи с протокола WebDav.
След като си инсталирах приложението му за Windows вече имам "локален"
Яндекс Диск. Мога да съхранявам файлове и после да са ми достъпни навсякъде.

За сравнение с аналозите:
Google Drive  DropBox  Yandex
5 GB                2G             10G

неделя, 8 април 2012 г.

Линукс Лайв - Linux Live

Universal-USB-Installer-1.8.8.9
unetbootin-windows-568
win32diskimager-RELEASE-0.3-r27-binary-alt1
LinuxLive USB Creator 2.8.11

петък, 11 ноември 2011 г.

Android versions...

Намерих полезезн за мен сайт за гледане на разликите във версиите на Андроидите:
http://socialcompare.com/en/comparison/android-versions-comparison

понеделник, 16 май 2011 г.

Първото ми тамагочи от Ebay

От днес съм двукратен "Fantastic Ebayer!".
Всъщност днес си получих първата пратка от ибей - едно рошаво тамагочи.

Тамагочито всъщност е регулируем токоизправител на базата на LM338K, със следните характеристики:
- In DC or AC 6V-30V
- Out DC 4.5V-28V 5A
Токоизправителят ми коства 27 лева с доставката и пристигна за 2 седмици
За сравнение само LM338K (онова металното върху радиатора) би ми струвал тук 23 лв, без монтаж, без радиатори, без останалите компоненти, текстолита...
А относно двукратния "Fantastic Ebayer!", май продавачите се скъсват да дават позитивни обратни връзки, може би за да стимулират добро отношение към себе си, както и повече покупки ;)

четвъртък, 21 октомври 2010 г.

TwittShit

Нещо много ме дразни тоя Туитър!!!
Следя 9 човека а ми се показват 1000 ре-туитнати простотии.

неделя, 5 септември 2010 г.

Hello AndroPhone :)

Welcome to the world of computers, devices and programming:)
In this small article I'll show how to setup an Android environment and I will make simple "Hello World!" (or "Hello AndroPhone!" ;) )

Before we start, we need:
- JDK - http://www.oracle.com/technetwork/java/javase/downloads/index.html
- Android SDK - http://dl.google.com/android/android-sdk_r06-windows.zip
- Eclipse IDE - http://www.eclipse.org/downloads/


So, lets get started.

I'll skip the explanations for installation of the JDK (Don't forget to set the Environment Variable JAVA_HOME to C:\Program Files (x86)\Java\jdk1.6.0_21 or smth similar to this).

Installing the Android SDK

We have to unzip the Android SDK and to execute the SDK setup.exe.
A terminal window will open for a few seconds, and then Android SDK and AVD Manager will open.
If you get this error message: "Failed to fetch URL https://dl-ssl.google.com/android/repository/repository.xml, reason: HTTPS SSL error. You might want to force download through HTTP in the settings." Choose Settings on the left. Check Force https://... sources to be fetched using http://


After we chose the version of the SDK and the API, we can continue with installation... It should finish in a while

Installing and configuring ADT Plug-in

In running Eclipse we have to select Help>Software Updates....
In the Available Software dialog, I click Add....
After that I enter the name for the remote site (for example, "Android Plugin") in the "Name" field, and in the "Location" field:
https://dl-ssl.google.com/android/eclipse/
In the Available Software view, I've selected the checkbox next to Developer Tools.
The final installation step here is to accept the license agreements and to restart the Eclipse.

After restart we have to configure the path to the Android SDK:


Note: If you have trouble acquiring the plugin, you can try using "http" in the URL, instead of "https" (https is preferred for security reasons).

Creating AVD

The last thing we need before start programming Android apps is to create new Vertual Android Device (AVD) from SDK setup.sdk.


Now everything is ready...

Creating and running an Android Project
We can create new Android Project, and output something on the screen.


Here,
- Project Name - the Eclipse Project name (the name of the directory that will contain the project files).
- Application Name - human-readable title for the application (the name that will appear on the Android device_.
- Package Name - package namespace, it must be unique.
- Create Activity - the name for the class stub that will be generated by the plugin. This will be a subclass of Android's Activity class. An Activity is simply a class that can run and do work. It can create a UI if it chooses, but it doesn't need to. As the checkbox suggests, this is optional, but an Activity is almost always used as the basis for an application.
When the project is created, the plugin had created for us some class stub and ui things.
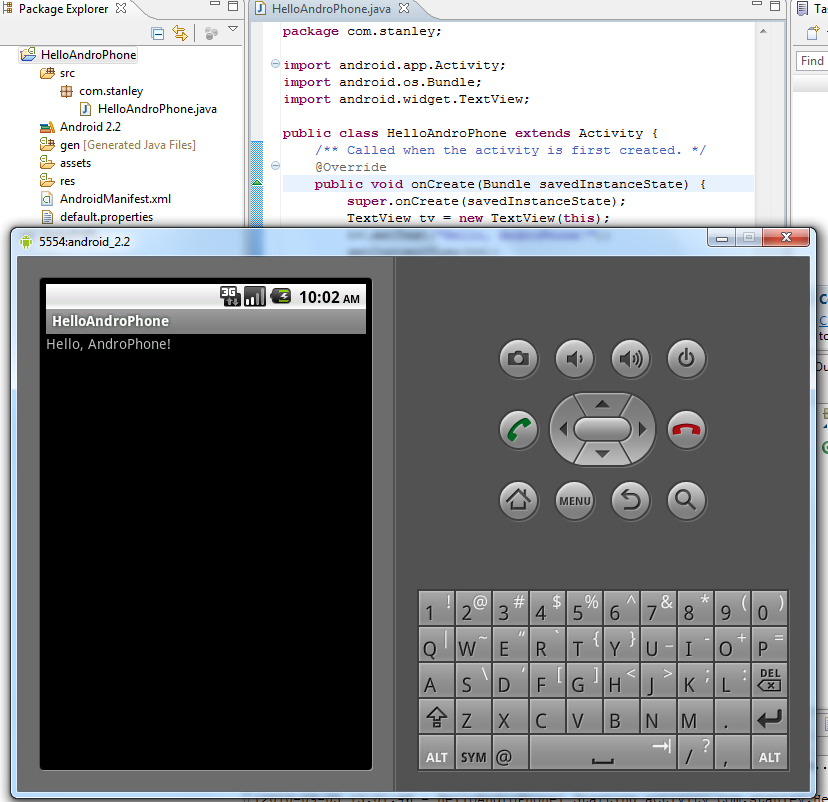
To check if we have normal working environment, we'll replace the code in HelloAndroPhone.java with:

package com.stanley;

import android.app.Activity;
import android.os.Bundle;
import android.widget.TextView;

public class HelloAndroPhone extends Activity {
/** Called when the activity is first created. */
@Override
public void onCreate(Bundle savedInstanceState) {
super.onCreate(savedInstanceState);
TextView tv = new TextView(this);
tv.setText("Hello, AndroPhone!");

setContentView(tv);
}
}


To run our project, we have to right-click the HelloAndroid project folder and select Run As > Android Application.
If all goes well,the emulator will open and we will see our first Android application!


That's it. We have done our first Android application.

сряда, 9 юни 2010 г.

Савов - Чужди неща

С голямо задоволство разбрах, че новия клип на Савов - Чужди Неща е вече ГОТОВ.
Много мелодична и хубава песничка, типична за него:)
Не знам, как успява да измисли и мелодията и текста - талант!

Всъщност не измина и година, от както, БиТиВи започнаха направата на клипа.
Надявам се следващия да го приключат за месеци а не за години ;)

Повече инфо за Савов, може да видим на сайта му.

вторник, 1 декември 2009 г.

Log4j Levels